I have had such a great response with my sign up list! And so many of you are still so curious about the sunbleaching that I've decided to do this week on some more details! I just love the results! And this is just the beginning!


Here is "fiesty" in process, and done. As with the sheets of fabric (in my first entry), mix all your colors before, the sun dries things pretty fast and the wetter your fabric is the more the dyes can move and develop, giving more contrast. After submerging the tank top to wet it, i placed an opened plastic grocery bag in between the two layers of fabric to keep the dye from penetrating to the second layer. It creates an interesting 'shadow' effect on the back side if the dye is allowed to go thru, just depends on what you're looking for. I painted on the dye w a 1" foam brush and blended it a bit, the fabric being wet helps w that. Time to place shadow on it: The letters are thick paper from the scrapbooking dept, they absorb a lot of the dye giving a nice contrast when done, and the blue wave design is some poster board i cut out a while back and have used on multiple projects, so although it absorbs it absorbs less, and bc it's been used the paper is more worn and bonds w the fabric making it difficult to remove when dry but leaving some dye behind and giving the mottled effect shown. The most intense contrasts came from crinlking the fabric and squashing it flat, and bc the fabric was very wet a large ammount of the dye made it to the peaks and away from the shadows.
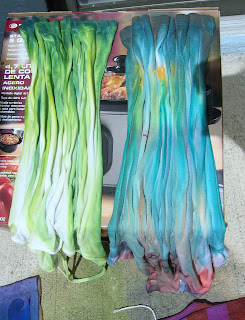
With 'grassy' tank, i put no plastic between the layers, submerged the tank and creased it on a box, which I then propped up at an angle. I then poured the dye onto the high end, in this case the bottom of the tank, one spoonful at a time at varying intervals, rewetting the fabric as i saw a need for more flow of the dye. The back side of the tank was on top, and has the most definition, and the front side of the tank that was on bottom has a 'shadow effect,' which is identical to the back side but not as defined.
On my 'happy' tank top, as with most others, i placed plastic in between the layers of the tank, but when i applied the dye w my foam brush I allowed the fabric to bunch in front of it, creating the line effect. This tank fabric is thin, so it dried faster leaving less contrast under the paper letters. The sun and cloud are from a sheet of plastic stencils. I cut them out to use by themselves. Notice how they leave a very defined edge, while the rice leaves a softer shadow.


'Imagine' is one of my favorites. The word is another cut out from a plastic stencil sheet, the goddess and vine are from some of the pieces I cut out from poster board and have used on many projects, and the small grains are grits. I was esperimenting w diff absorbing agents, and so far have found salt to be the only one to affect the flow of the dye, but the others create nice shadows. The shells are the big difference on this piece. Bc they are 3d they create soft shadows as the sun moves as the shirt dries! I wet this one several times to help this process as it dried, and the act of rewetting it softened the colors and helped them blend. Later I went back and used fabric markers to embellish and add some detail.


.JPG)


No comments:
Post a Comment